Use New Student Registration
| Note: New Student (Online) Registration is an add-on feature to Aspen. Contact your sales associate for more information. |
| Note: During configuration, you and your Implementation Consultant can customize Aspen's New Student Registration to suit your |
Use Aspen's New Student Registration to:
- Review the information submitted by the parent or guardian, and edit it as needed.
- Enter any additional information required by your
- Verify the student does not already exist in Aspen.
- Accept or deny the registration.
Process the registration from the New Student Registration Checklist. The Checklist side-tab has four phases that occur in this order:
-
Phase 1: Portal Registration (completed by parent/guardian)
-
Phase 2: Duplicate Student Verification
-
Phase 3: Review
-
Phase 4: Registration Approval
To process a new student registration:
- Do one of the following:
- Log on to the
- Log on to the School view. Select School > New Student Registrations > New Student Registrations.
A list of registrations submitted by parents/guardians appears.
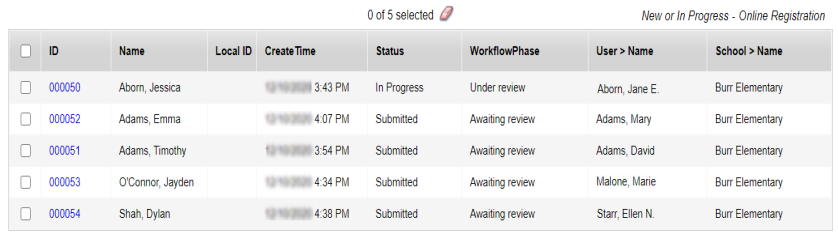
-
Note: Click the Filter icon, and select a filter to help you manage the list.
- Select a registration to review, and then click Checklist on the side-tab. The New Student Registration Checklist appears.
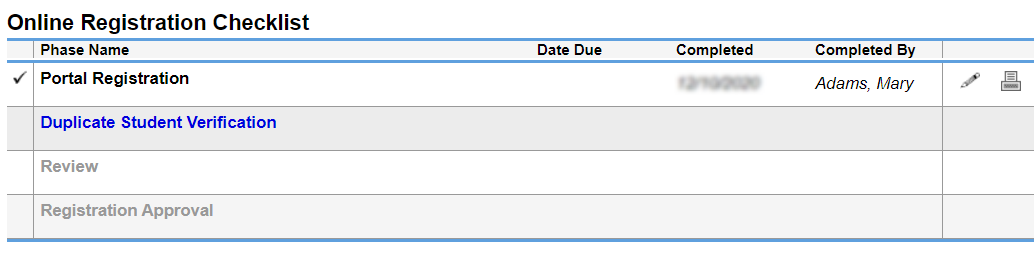
The parent or guardian already completed Phase 1, Portal Registration.
- To go to Phase 2, click Duplicate Student Verification in the checklist. The Duplicate Student Verification page appears.
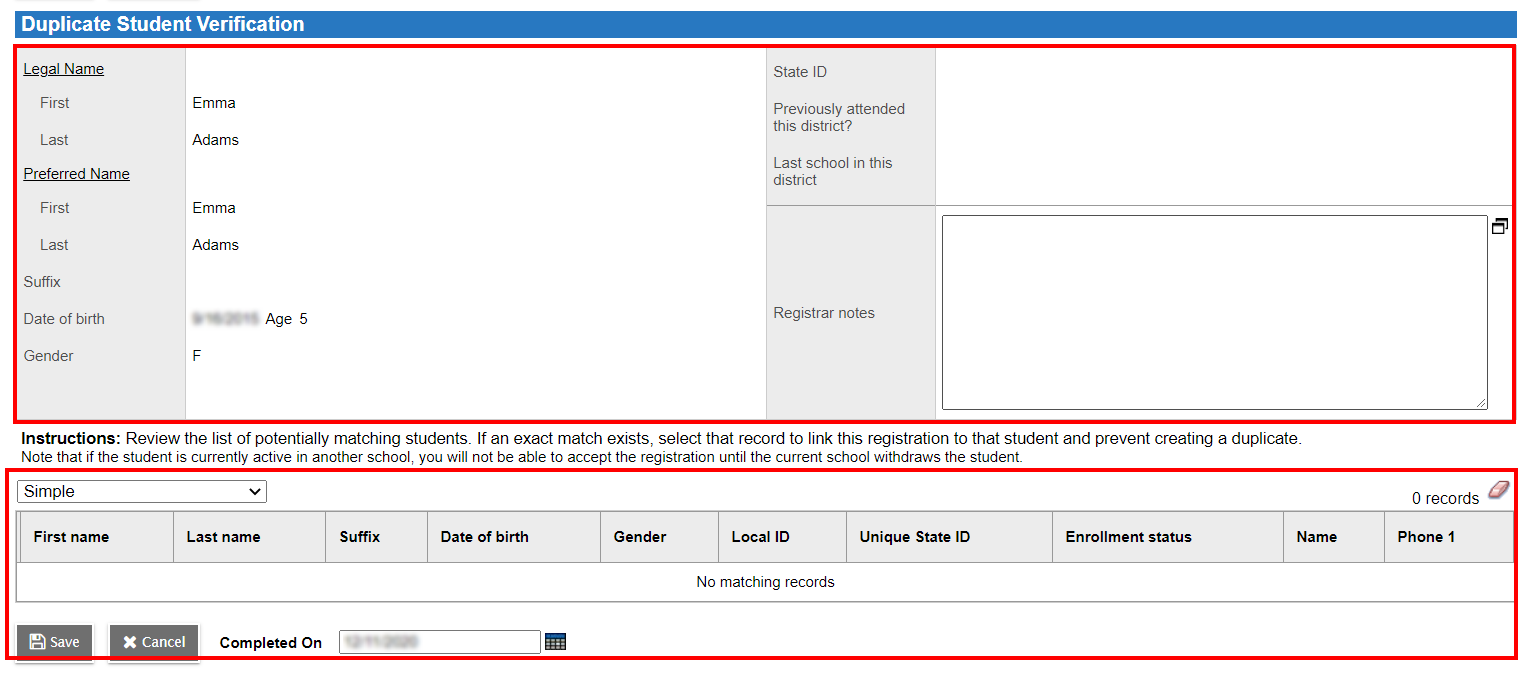
During Duplicate Student Verification:
- At the top of the page, review the information and enter Registrar notes, if needed.
- At the bottom of the page, determine whether this registration is a duplicate by comparing it to the student records that appear:
If a match appears in the list, select it and click Save. The student registration is updated with the new information submitted by the parent/guardian.
At the drop-down above the match(es), Simple appears. Click Detail to view this information along with the student's photograph, if one is uploaded.
If you do not find a match, click Save to complete the Duplicate Student Verification phase. You return to the New Student Registration Checklist.
Note: Aspen searches through all student records for a potential match based on the student’s name and date of birth.
-
To go to Phase 3, click Review on the checklist. Student data appears on a series of tabs as it was submitted by the parent/guardian.
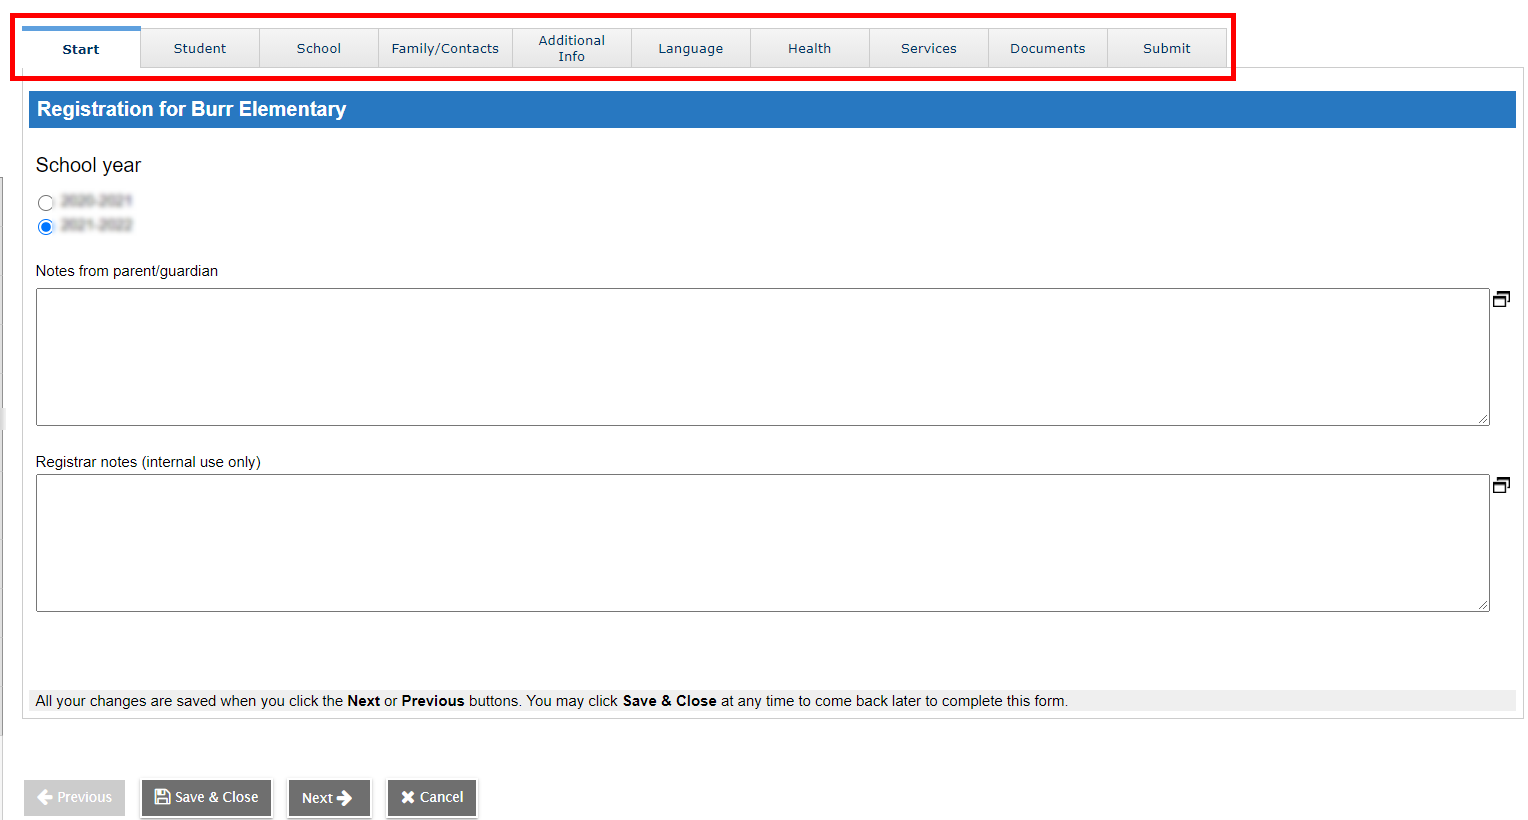
- Click each tab, and review the information entered by the parent/guardian. Enter or edit information as needed. Pay special attention to:
- Student tab: Under Address Information, click Edit to view the Formatted address field. Is the student's address complete and entered in the correct format?
- School tab: Did the parent/guardian select the correct school based on the student's primary address? If not, select the correct school, and then click Save.
- Family/Contacts tab: First, note the Matched Contact column to see if Aspen located a match for each contact, based on the information entered by the parent/guardian. Then, click each person listed under Parent/Guardian/Other Contact and do the following
- On the Demographics sub-tab:
- View the Formatted address field. Are the physical and mailing addresses complete and in the correct format?
- Check that phone number(s) and email address(es) are listed.
- Remember, a student can only have one primary address. Determine the primary address if the student's parents live separately but share custody.
- On the Demographics sub-tab:
- On the Contact Match sub-tab:
- To avoid duplicate records, check whether the contact already exists in Aspen. In the Matched Contact column, type the name in the Last Name field. As you type, the drop-down narrows the list of potential matches to choose from.

- Select the matching contact, if found. The Students sharing this Matched Contact section displays other student(s) associated with this contact. Click Save to save your changes on the Contact Match sub-tab.
Note: Aspen will only make a match automatically if the contact's first and last names are entered exactly as they appear in Aspen, and either the email address or phone number is identical.
Notes:
At the bottom of most tabs, Reviewed all fields appears. Select Yes or No to move to a different tab. You cannot complete the Review phase until you make a selection at this field.
You can print out the information on most tabs. Click the printer icon
 in the top-right corner of the page. For an overall view of a student's registration, print the Online Registration Summary report.
- To avoid duplicate records, check whether the contact already exists in Aspen. In the Matched Contact column, type the name in the Last Name field. As you type, the drop-down narrows the list of potential matches to choose from.
- When you have reviewed all of the tabs, go to the Submit tab and click Submit. The New Student Registration Checklist appears.
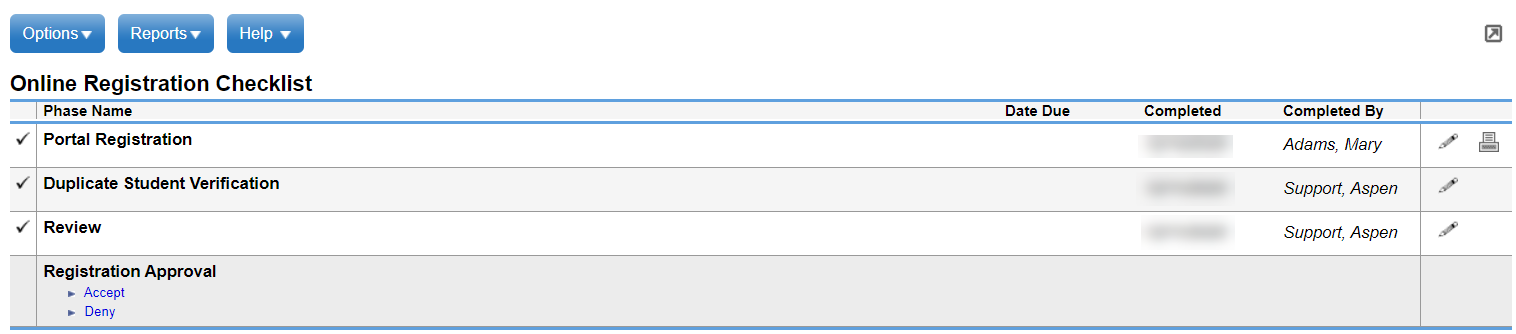
- At Phase 4, Registration Approval, do one of the following:
- Click Accept to complete the workflow, and register the student. You may need to enter an
- Click Deny to end this registration workflow without registering the student.
- If you click Deny, the Registration Denial page appears.

-
Do the following:
-
At the Denial reason field, type in the reason for rejecting the registration. This text is for internal purposes.
-
You can review the email message in the Notification to Send to Primary Contact field. In the free text field below, type a reason for the denial. This text appears in the email message sent to the contact.
-
Click Save.
-
If you click Accept, the New Student Registration page appears, displaying the Enrollment sub-tab.
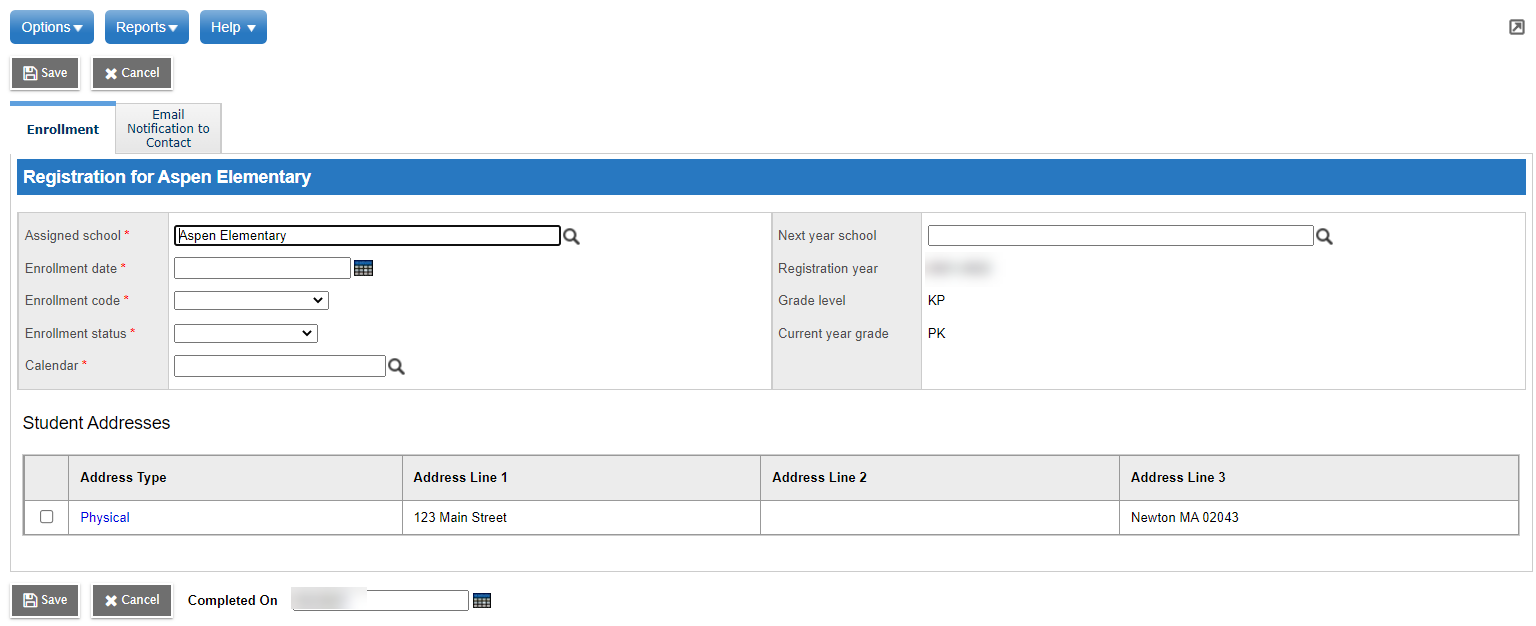
-
Use the table to enter information in the fields on the Enrollment sub-tab.
Field
Description
Assigned school
Displays the school the student is enrolled in. Click
 to edit the assigned school, if needed.
Enrollment date
Type the date the student enrolled, or click
 and select the date.
 Enrollment code
Select the enrollment code from the drop-down.
Enrollment status
Select the student's enrollment status from the drop-down.
Calendar
Click
and select the Calendar ID associated with the student's school. Next year school
Click
and select the school this student will attend the following school year. Registration year
Displays the school year the student is registered for.
Grade level
Displays the grade the student is registered for.
Current year grade
Displays the student's present grade.
Student Addresses
The student's address(es) appear here. If needed, you can click the address link, edit the address, and then click Save.
-
Click the Email Notification to Contact sub-tab. You can review the email message prepared by the district that is sent when a registration is accepted. If the school prepared awelcome message to add to the district's email, it also appears for review.
-
Click Checklist on the side-tab to return to the student's completed registration.
New Student Registration Email Notifications
Aspen automatically sends email notifications to a student's parent/guardian during the registration process. Select staff can also receive email notifications. Work with your Implementation Consultant to set up email notifications in the New Student Registration preferences.
Aspen sends an email notification to a student's primary contact when the:
-
Online registration is successfully submitted
-
School accepts the registration
-
School denies the registration
-
Registrar changes the school requested by the parent
A school can create a welcome message to appear on the district email that is sent to contacts when a registration is accepted.
To create a welcome message from the school:
-
Log on to the School view.
-
Select School > Setup > Details. The General sub-tab of the Details page appears.
-
Click the Online Registration sub-tab. The top part of the page displays the district's message sent to the parent or contact when their student is accepted.
-
Type in a welcome message from your school.
-
Click Save.
When a registrar changes the school selected by the parent, Aspen can send an email notification to specified staff at the new school.
To send an email notification to specified staff:
-
Log on to the
-
Select Admin > Data Dictionary > Tables.
-
Search for and select the Staff table, and then click Fields on the side-tab.
-
Search for and select the Receive Online Reg emails field.
-
Select the Enabled checkbox.
-
Click Save.